Create a Web Form for Uploading Pictures for a High School Reunion.
Are you planning to create a website for your high school reunion? Wondering what is the easiest and near hassle-free way to do so? Then you lot have come up to the correct place.
Creating a website for a loftier school reunion is the best way to let everyone know and register for the event easily.
Nevertheless, it can actually get either tricky or expensive if you are not a techie. So people often search for a style that is piece of cake and affordable. And there is one simple solution to create a high school reunion website with ease. Yes, we are talking almost WordPress, the most pop CMS in the world.
Every bit you can judge, today we will let you know near how y'all can quickly and hands create a high schoolhouse reunion website using WordPress. So without wasting any more of your fourth dimension, permit's get right into it.
Why Do You Need a Website for Your Loftier School Reunion?

First affair start, do you actually demand a website for your high school reunion? Later on all, it takes fourth dimension to build a website, and if you are not an expert, then you might as well have to hire one to do so. Then is information technology all worth information technology?
The respond is, admittedly! The times of calling out each and every mate, let them know about the details of the reunion, and collecting reunion fees are long gone. With a website for the event, you tin can show your event details and even let your batchmate annals for the event by paying a specific fee.
So at that place are no reasons that y'all should not have a website for your high schoolhouse reunion.
How Y'all Can Build a High Schoolhouse Reunion Website?
There are many ways you tin can build a website for your high school reunion website. Simply if you are like one of usa, you might be seeking what is the way to do that without much effort and cost, and that is what we will be showing you lot today.
At present earlier we start building our website, let's get to know what you will need to get started with the website.
Pre Requisites to Build a High School Reunion Website

We are now off to build our reunion website. In gild to build your website, outset, you need to have the following –
- A WordPress Site
- WP User Frontend
- WP User Frontend (Pro)
To make our site look skillful and center-catching, we volition also employ the post-obit free plugins –
- Elementor
- Happy Addons
WordPress is the CMS that we will employ for our website and we will use WP User Frontend Pro to build the Registration Folio, User Profile and to have payment from the users. Beneath are the steps to create a High School Reunion Website –
- Stride 1 – Install and Actuate WP User Frontend
- Step 2 – Activate the WP User Frontend Pro Version
- Step 3 – Activate the User Directory and Paid Membership Pro Integration
- Step 4 – Install all WPUF Pages
- Step 5 – Create a Registration Course
- Step 6 – Turning on Payment for Registering
- Step 7 – Creating a Page to Display Registered Users and their Payment Status
- Step 8 – Creating a Navigation Menu
- Stride ix – Create a Homepage for your Loftier School Reunion Website
- Step 10 – Edit the Homepage with Elementor and HappyAddons
- Step 11 – Set up the Homepage as Your Default Homepage
Step 1 – Install and Actuate WP User Frontend
Once your WordPress site is set up, log in to your WordPress Admin Dashboard. At present to install the WP User Frontend Pro plugin, navigate to Plugins > Add together New, search for WP User Frontend. Once you find it, install and activate the plugin.
Step 2 – Activate the WP User Frontend Pro Version
Some of the features of WP User Frontend that are required for building our High Schoolhouse Reunion website are pro features. So yous demand to purchase and activate the WP User Frontend Pro version for these.

Here is how you can buy and install the WP User Frontend Pro version.
Stride iii – Activate the User Directory and Paid Membership Pro Integration
When you are done installing the pro version of WP User Frontend, you will find the Modules choice in the WP Admin Dashboard > User Frontend.

From the Modules, toggle the Paid Membership Pro Integrations and User Directory to plow the features on. Now nosotros will be able to add Paid membership option and create a Registered User List to know the people that are coming to the issue.
You can also plough on Stripe Payment if you want to add together the credit menu payment selection.
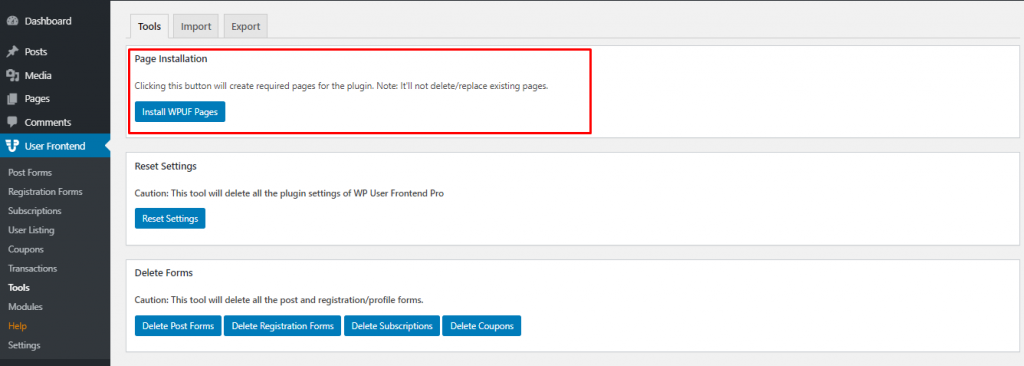
Step 4 – Install all WP UF Pages
Every reunion websites demand a ready of pages, such as registration, login, and profile pages. Apart from that, a payment page and a page to display all the registered users are also needed for an ideal reunion website.
Even so, with WP User Frontend Pro, y'all don't take to create all these pages by yourself. Instead, WP User Frontend Pro will automatically create these pages for yous. All you demand to practice is navigate to WP Admin Dashboard > User Frontend > Tools and click on Install WP UF Pages.
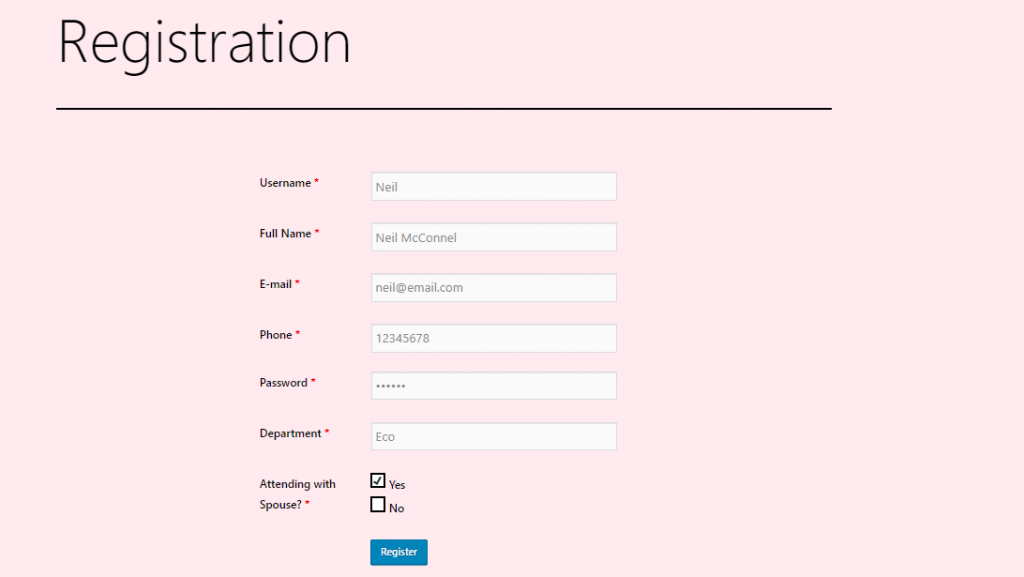
Step 5 – Create a Registration Course
Now nosotros need to create a Registration Form for the students to register for the event. In order to practise that, get to WP Admin Dashboard > WP User Frontend > Registration Course > Add Form.
From here, Y'all tin add together the fields past merely dragging and dropping them into the grade. Below is our form –
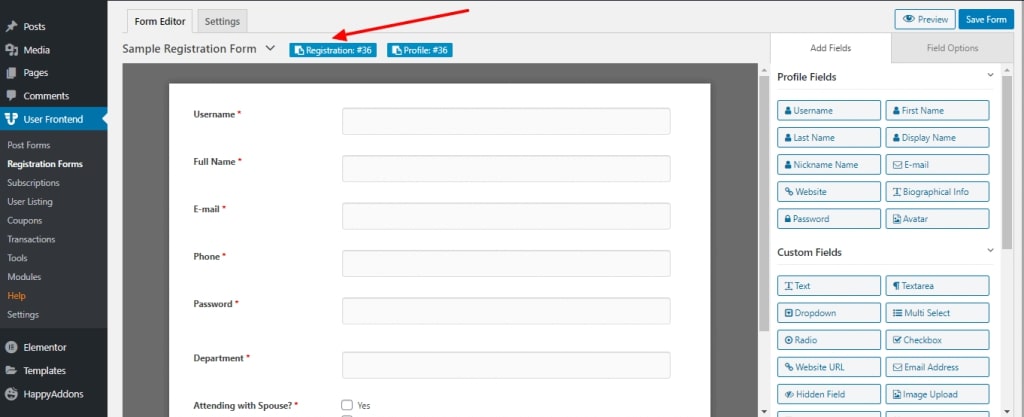
After that, copy the shortcode, as we will add together this code to our registration page.
To view our newly created pages, go to WP Admin Dashboard > Pages > All Pages. From here, discover the Registration Page and paste the code within a shortcode block.

Now y'all volition have to set this page as our default registration page overriding the defaults. Nosotros will be able to practise that from WP Admin Dashboard > User Frontend > Settings > Login / Registration.

Plough on the Login/Registration override and set the newly created Registration page as your Registration page. Nonetheless, by default, user registration is turned off in WordPress. So as long as you do not permit anybody to register on the site, no one will be able to register. To permit that, navigate to Settings > General > Membership from the admin dashboard and plough on the Anyone can Annals option.

Yous are now all set to let students annals on the site.
Step vi – Turning on Payment for Registering
If y'all are charging the students for attention the reunion, WP User Frontend's Subscription feature volition allow you lot to practice that easily.To do that, visit WP Admin Dashboard > User Frontend > Subscriptions. From hither just add a billing amount. You tin can also enable the Recurring amount option if needed.

Now get to User Frontend > Settings > Payments and turn on Enable payments on your site option.
Afterwards that select the Subscription folio and enable Subscription at registration so that people get redirected to the payment page while registering for the event.

Now select the payment page and add together your banking concern and Paypal info, where the students can deposit the corporeality. Once y'all are done, click on Save Changes.

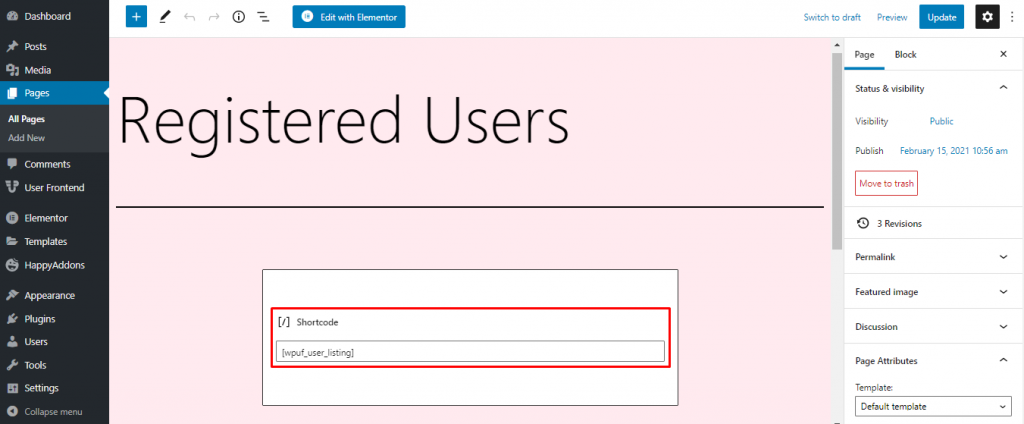
Stride 7 – Creating a Page to Display Registered Users and their Payment Status
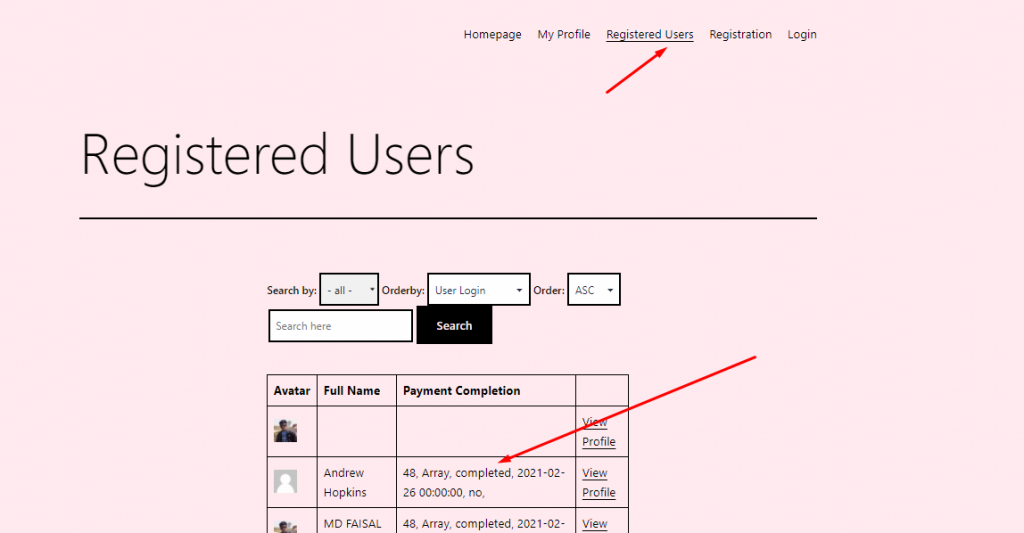
When it comes to reunions, who is coming to the outcome and who is not, have a large impact on more than attendees. So a folio with all the confirmed attendee's lists tin can be an effective way to encourage more students to annals.
For that, you will have to employ the User Listing feature of WP User Frontend.
But first, add together a new page to your website. You tin can proper name it Registered Users, just similar us. Now paste the shortcode [wpuf_user_listing] inside the body of the using a shortcode block.
Later that, let's become to the backend of this shortcode to set, exactly what data will be displayed on this newly created folio.
Now navigate to User Frontend > User Listing from the admin dashboard. Here using the meta fields, you can ready the information to brandish on our Registered Users page.
You lot tin can add meta fields to show specific data on the folio. As nosotros're planning to display only the First Proper name and Payment Condition on the folio, we volition add two meta fields by clicking on the Add together Meta Field and set the meta keys to Start Name and _wpuf_subscription_pack.

The meta cardinal First Name lets u.s. display the offset proper name of every registered user on the website, while wpuf_subscription_pack will let us show the payment condition of these users.
You tin also add together other meta fields if needed. When you are washed, don't forget to salvage the changes.
Now it's fourth dimension to start decorating your site. The get-go pace to do that is by creating a primary menu. This can be washed from WP Admin Dashboard > Appearance > Menu. From here you can select the pages that you want to link on your navigation menu.
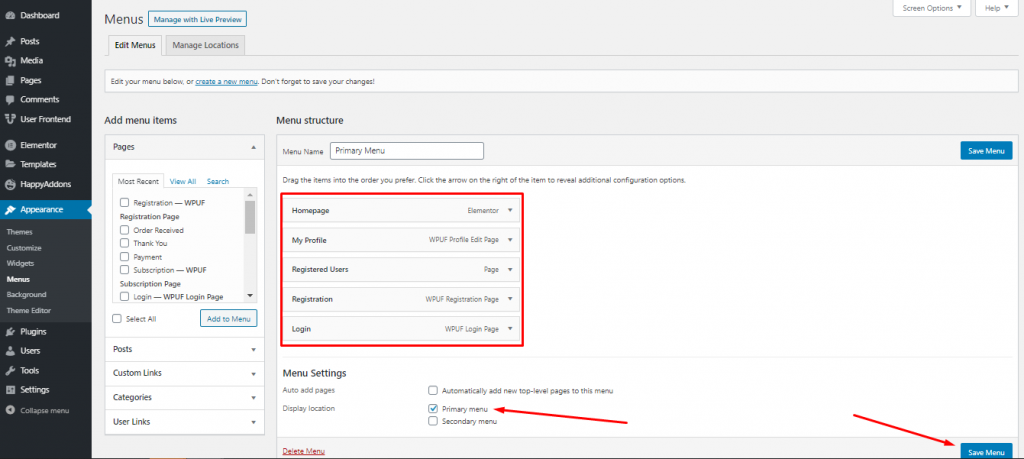
Once you are done, set the display location to the Primary Carte and save your bill of fare to ostend.
Step 9 – Create a Homepage for your High School Reunion Website
Finally, nosotros're all set to create our homepage. For that, we will employ Elementor, one of the nearly pop page builders for WordPress. Nosotros volition also use Happy Addons, which works as an extension to the Elementor. Here's a guide on how to edit a page with Elementor, if y'all don't have any prior experiences with that.
Now let'south start by installing Elementor and Happy Addons. Don't worry, both are gratis to install and use!
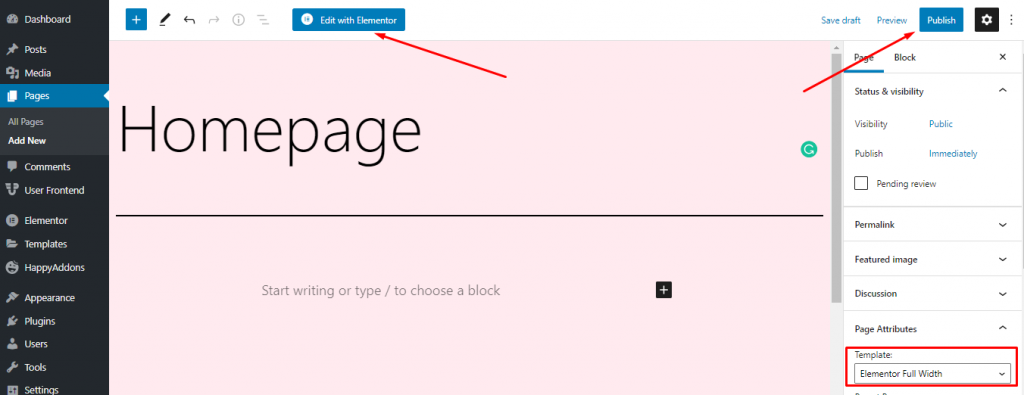
After installing the plugins, create a new page that we will turn into a cute homepage. You can add a new page from WP Admin Dashboard > Pages > Add together New
Give the page a name and prepare the folio attribute to Elementor Total Width. After that publish the page and click on Edit with Elementor.
Step 10 – Edit the Homepage with Elementor and HappyAddons
One time you click on the Edit with Elementor, a new folio volition appear. This is the Elementor editor interface. As you can encounter, apart from the menu bar, we don't have anything on the homepage up until now.
Let's start by adding a groundwork epitome to our website. To do that,
- Click on the Settings button, which is located on the lesser left of the page.
- Click on Style and set the groundwork type to Classic.
- Now you lot volition find the option to upload the background prototype.

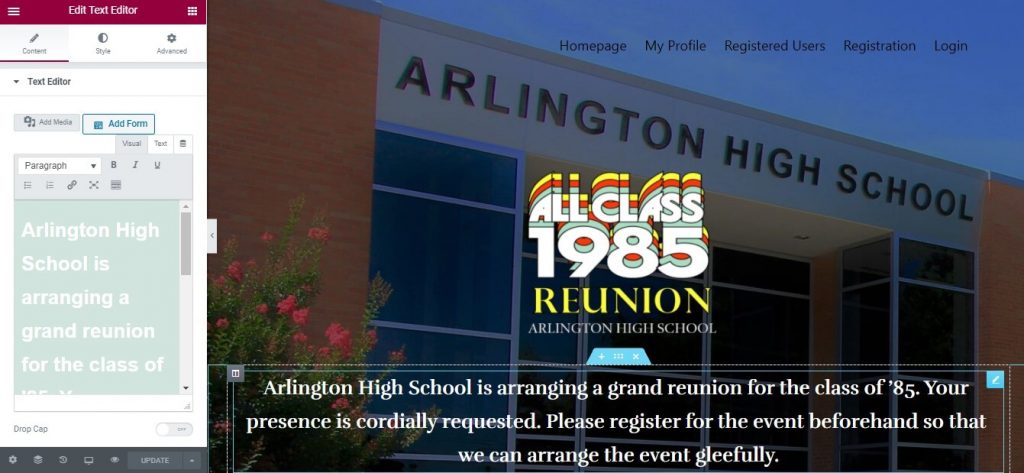
How does our homepage wait like upwardly until at present? A bit empty? Let's add a logo to our page then!
Here's how we can add an image to the page.
Next up, nosotros volition add together some text equally consequence details, in the same way.
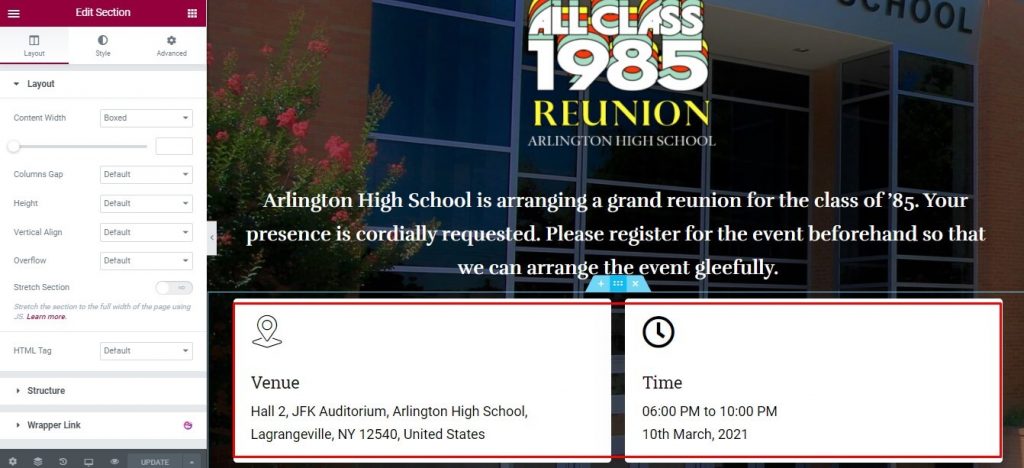
At present we will add a couple of Info Boxes. Info Box is a HappyAddons widget, that you can apply for costless. We will then customize both the infobox and use them to show the venue and fourth dimension of the issue.
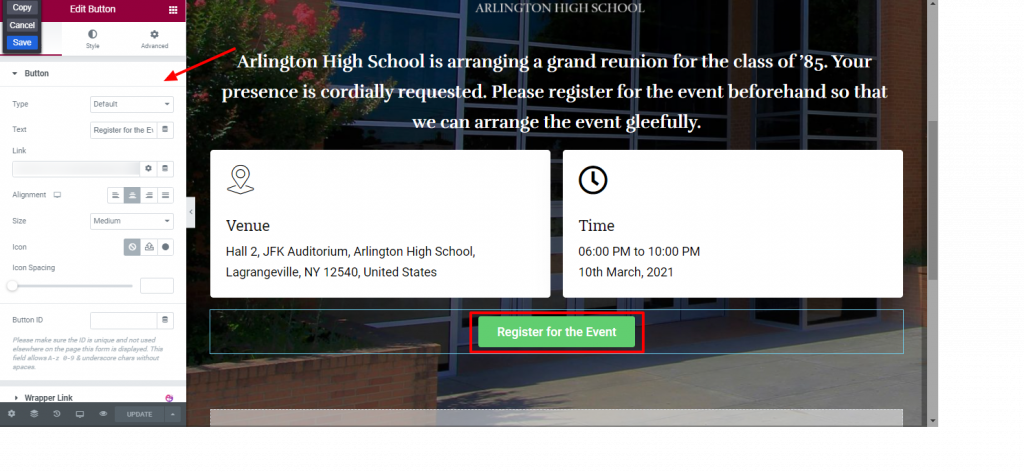
Aye, we are virtually washed. Under the Info Boxes, we will just add together a button with a link to the registration folio to end it up. Y'all can search for the push widget from the Elementor elements list.
In one case you are all done, save the page exit from the Elementor editor.
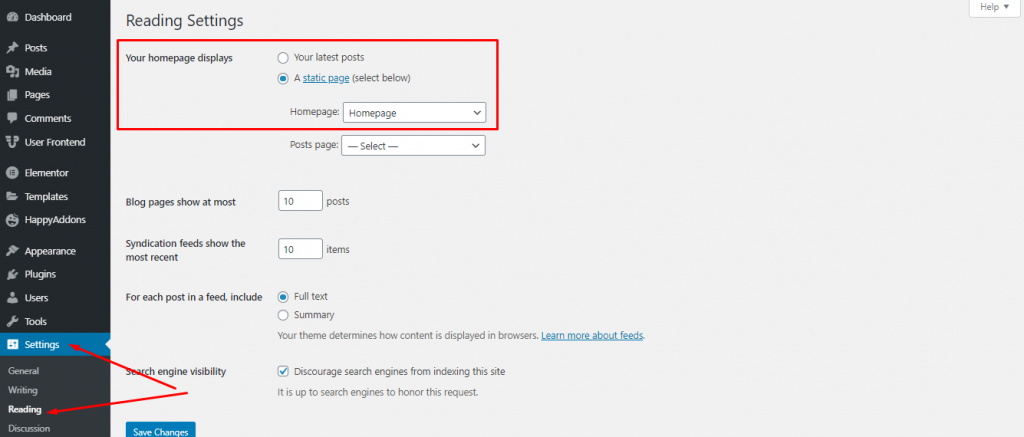
Stride 11 – Set the Homepage equally Your Default Homepage
The next step is to make the newly created homepage your default homepage. The process is very easy. Just head over to Settings > Reading from the admin dashboard. Here, yous can discover the Your homepage displays option, prepare it to show a static folio. Side by side, select the folio you merely created and designed, save the changes and we're done!
How our High School Reunion Website Turned Out
If you follow the exact steps that nosotros showed you, your homepage should await something like this.

From here, users (students) can go to the registration page by clicking on the "Register for the Consequence" button.
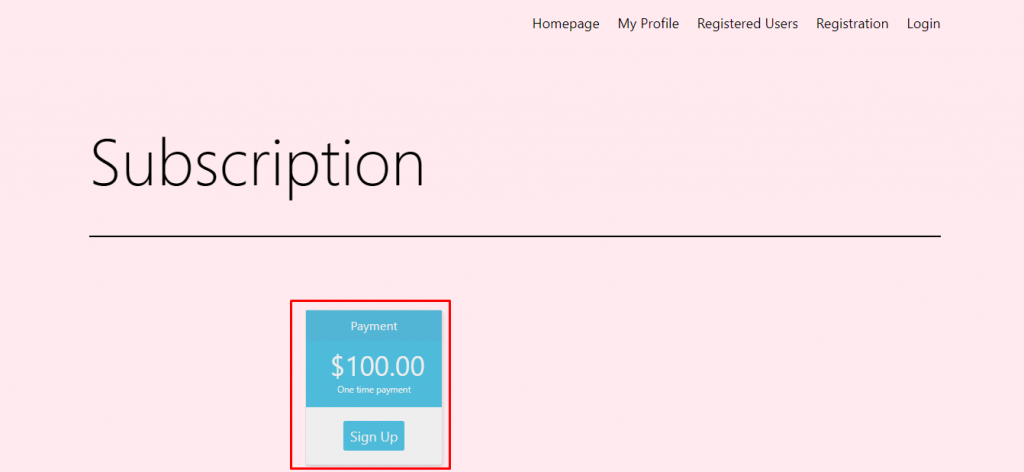
They will exist asked to make the payment needed for attending the outcome. And merely then they will be able to register for the outcome.
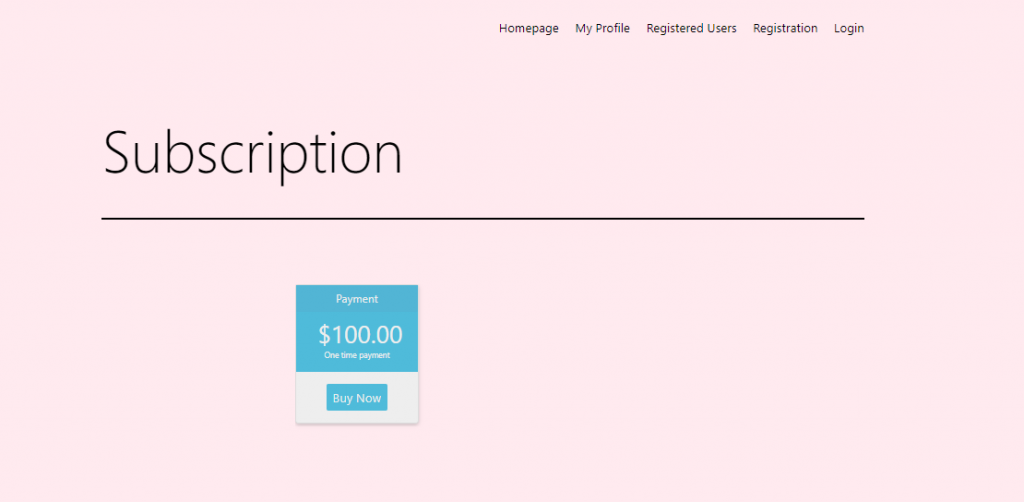
After successful registration and login, they will one time over again be redirected to the payment folio.
Once the payment is completed, you lot can then approve the pending payments from WP Admin Dashboard, by navigating to User Frontend > Transactions.
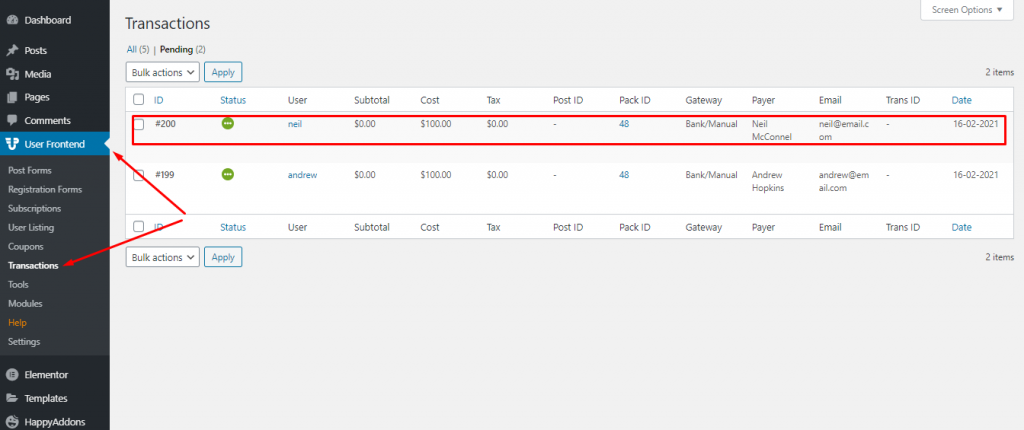
Anyone can now see the registered users and users with completed payments.
Finishing Upward
Your high school reunion should exist a special one. And if a website tin bring more students together for the reunion, and then that is the way to go, right?
Moreover, as you can run into from the tutorial, creating a loftier school reunion website using WordPress is very easy. WP User Frontend Pro plugin volition let you create a registration page and a payment process for your reunion website, so y'all will not take to worry about collecting the reunion fees from each and every one individually.
We promise now you can easily create a website for your high schoolhouse reunion after reading this guide. All the same, we are here if yous need any back up while doing that. Just get out us a comment and we volition get dorsum with the solution.
If you take any prior feel of building a high schoolhouse reunion website using WordPress, don't forget to share your noesis with us.
Source: https://wedevs.com/blog/352763/how-to-create-high-school-reunion-website-using-wordpress
Posting Komentar untuk "Create a Web Form for Uploading Pictures for a High School Reunion."